I’ve been working on opensubs.io for a couple of months, and I got all sorts of topics to share about the experience of building and deploying an Elixir application to production.
Today I’ll start from the end and talk about the deployment process I used for this project. I like this guide more as documentation for my project, but I hope you can find it useful.
A couple of weeks ago I managed to set up the production environment where opensubs.io was going to run. The project is open source on Github if you want to check out. I’ll be using it as a base for this guide.
By the end of this guide you will be able to:
- Create releases with Distillery
- Use Docker to create the release image
- Setup AWS ECS cluster, EC2 and RDS
- Deploy the application
I’ll assume you have some basic knowledge of all the topics we are going to cover but if you feel stuck write a comment this Github issue.
What you’ll need
- Elixir >= 1.5 (Installing Elixir - Elixir)
- Phoenix 1.3 (Installation – Phoenix v1.3.0)
- Postgres 9.6 (Installing Postgres)
- AWS Account (Amazon Web Services, only free tier services will be used 👍)
Setup the stage
OpenSubs started as an umbrella project with two apps:
subs- Core app that holds the domain, business logic, and database accesssubs_web- Phoenix app that serves frontend and web API
If you want to have the initial setup, you can go ahead and check out the project’s first commit:
git clone git@github.com:joaquimadraz/opensubs.io.gitcd subs && git checkout 91c25e4mix deps.getcd apps/subs && mix ecto.create(Assuming you have Postgres up and running at this point)cd ../.. && mix phx.server
I’ll be creating a new branch deployment from 91c25e4 to commit step by step while following guide.
The app should be up and running in development mode at this point, but we still need to make some changes to run it in production mode. For this part, I’m taking bits from Phoenix’s documentation on making it ready for Heroku (Even though we will not be running it there) Deploying on Heroku – Phoenix v1.3.0.
First let’s start by setting up the database
We will be using an AWS RDS instance, so the only thing we need is to set url config on our Ecto repository configs.
Open apps/subs/config/prod.exs and add this configuration:
use Mix.Config

config :subs, Subs.Repo,
  adapter: Ecto.Adapters.Postgres,
  url: System.get_env("DATABASE_URL"),
  pool_size: String.to_integer(System.get_env("POOL_SIZE") || "10"),
  ssl: false
This is straightforward configuration. We will freeze DATABASE_URL at compile time, so we need to go to apps/subs/lib/subs/repo.ex and remove the configuration there.
Now we need to make our Phoenix app ready for production
Open apps/subs_web/config/prod.exs and add the following configurations to SubsWeb.Endpoint:
config :subs_web, SubsWeb.Endpoint,
  load_from_system_env: true,
  url: [host: {:system, "HOST"}, port: {:system, "PORT"}],
  server: true,
  version: Application.spec(:subs_web, :vsn),
  secret_key_base: System.get_env("SECRET_KEY_BASE"),
  session_cookie_name: System.get_env("SESSION_COOKIE_NAME"),
  session_cookie_signing_salt: System.get_env("SESSION_COOKIE_SIGNING_SALT"),
  session_cookie_encryption_salt: System.get_env("SESSION_COOKIE_ENCRYPTION_SALT")
Since Elixir is a compiled language, we can have the configuration set at compile time and at runtime.
All the configs we are getting from the environment, for instance, SECRET_KEY_BASE needs to be present at compile time when creating the Docker image.
Let’s also set session cookie configurations for the sake of completeness.
HOST and PORT will be loaded at runtime, and we will configure them on AWS ECS later.
When I started opensubs.io I wanted to use Webpack instead of Brunch so I’ve removed everything related with assets that’s why the cache_static_manifest is not present in the configuration for this example.
Also, we will not need prod.secrets.exs since all the configurations will be set from ENV variables. We can remove the import.
This should be enough for now. Let’s try running the app in production:
MIX_ENV=prod DATABASE_URL=postgresql://postgres:postgres@localhost/subs_dev PORT=4001 mix phx.server
Create releases with Distillery
The first step is to compile our application into an Erlang/OTP release and for that process with will be using Distillery.
Add distillery as dependency to the root mix.exs and run:
mix deps.get && mix release.init
There are a couple of things to be done here.
First let’s change Distillery’s rel/config.exs file to get the current version from subs_web application:
set version: current_version(:subs_web)
This will make the versioning of releases consistent with the version of the app.
Also, we need to fix the release name. For umbrella projects, Distillery uses the project’s folder name to build the release name. opensubs.io is an invalid name for a release name because of the dot. Just replace the dot with an underscore so it does not fail to compile.
I’ve actually opened a PR to fix this: https://github.com/bitwalker/distillery/pull/397
Now we need to take care of the database.
I grabbed the guide that is on the Distillery’s Github to run migrations and adapted it a bit to have not only the migrations run before the app gets started but also to create the database if needed.
Distillery has a pre_start_hook configuration that provides just that. After adding the configuration, the release section of the Distillery config should look like this:
release :subs do
  set version: current_version(:subs_web)
  set applications: [
    :runtime_tools,
    subs: :permanent,
    subs_web: :permanent
  ]
  set pre_start_hook: "rel/hooks/pre_start.sh"
end
Now we have to create the rel/hooks/pre_start.sh script:
#!/bin/bash
bin/subs command Elixir.Subs.Tasks.ReleaseTasks setup
I’ve decided to place tasks under apps/subs/priv/tasks, so just go ahead and create the folder.
Now in order for the files under priv/tasks to be compiled and available on the pre_hook_script we need to add the path to elixirc_paths on mix.exs:
defp elixirc_paths(_), do: ["lib", "priv/tasks"]
Finally we will add the ReleaseTasks module under apps/subs/priv/tasks/release_tasks.ex.
It has a couple of changes from the one available on Distillery’s Github, mainly the create_database/0 function:
defmodule Subs.Tasks.ReleaseTasks do
  @start_apps [
    :postgrex,
    :ecto
  ]

  @repo Subs.Repo

  @otp_app :subs

  def setup do
    boot()
    create_database()
    start_connection()
    run_migrations()
  end

  defp boot() do
    IO.puts "Booting pre hook..."
    # Load app without starting it
    :ok = Application.load(@otp_app)
    # Ensure postgrex and ecto applications started
    Enum.each(@start_apps, &Application.ensure_all_started/1)
  end

  defp create_database() do
    IO.puts "Creating the database if needed..."
    @repo.__adapter__.storage_up(@repo.config)
  end

  defp start_connection() do
    {:ok, _ } = @repo.start_link(pool_size: 1)
  end

  defp run_migrations() do
    IO.puts "Running migrations..."
    Ecto.Migrator.run(@repo, migrations_path(), :up, all: true)
  end

  defp migrations_path(), do: Path.join([priv_dir(), "repo", "migrations"])

  defp priv_dir(), do: "#{:code.priv_dir(@otp_app)}"
end
To test everything let’s compile, create a release and run our app in production mode:
export DATABASE_URL=postgresql://postgres:postgres@localhost/subs_prod && export MIX_ENV=prod*mix release --env=prodPORT=4001 _build/prod/rel/subs/bin/subs foreground
* Depending on your Docker version, you might need to use @docker.for.mac.host.internal instead of @localhost for the database url so that the container can access the host’s Postgres. Read more about it here.
Note on the first step we are defining DATABASE_URL environment variable to be set on the configuration at compile time. Also, note that the database name is subs_prod which means it will be created when starting the application if it does not exist by our pre start hook script.
Hopefully, we should be able to see the boot script output and Phoenix telling us the app is running:
Booting pre hook...
Running migrations...
00:00:00.000 [info] Already up
00:00:00.000 [info] Running SubsWeb.Endpoint with Cowboy using http://:::4001
Use Docker to create the release image
One of the motivations of building OpenSubs was for me to be able to get in touch with technologies that I’m not comfortable with and Docker was on the list.
On my first setup, I ended up with a script that was building the release and a simple Dockerfile that was coping the release files inside the release image.
It was working, but everything felt clunky after reading Clutivate’s article on Building and configuring a Phoenix app with Umbrella for releasing with Docker. What they suggest is to have both build and release process on the same Dockerfile using Docker multi-stage builds, which I didn’t even know it was possible.
You can read more about Docker multi-stage builds here Use multi-stage builds - Docker Documentation.
This is great because now we have a portable solution to release our project. The only thing we need to have is Docker available in the build environment. Integrating with Travis CI was painless.
After following their section on Containerize with Docker, here’s the Dockerfile I ended up with:
# Alias this container as builder:
FROM bitwalker/alpine-elixir-phoenix as builder

ARG PHOENIX_SECRET_KEY_BASE
ARG SESSION_COOKIE_NAME
ARG SESSION_COOKIE_SIGNING_SALT
ARG SESSION_COOKIE_ENCRYPTION_SALT
ARG DATABASE_URL

ENV MIX_ENV=prod \
    PHOENIX_SECRET_KEY_BASE=$PHOENIX_SECRET_KEY_BASE \
    SESSION_COOKIE_NAME=$SESSION_COOKIE_NAME \
    SESSION_COOKIE_SIGNING_SALT=$SESSION_COOKIE_SIGNING_SALT \
    SESSION_COOKIE_ENCRYPTION_SALT=$SESSION_COOKIE_ENCRYPTION_SALT \
    DATABASE_URL=$DATABASE_URL

WORKDIR /subs

# Umbrella
COPY mix.exs mix.lock ./
COPY config config

# Apps
COPY apps apps
RUN mix do deps.get, deps.compile

WORKDIR /subs
COPY rel rel

RUN mix release --env=prod --verbose

### Release

FROM alpine:3.6

# We need bash and openssl for Phoenix
RUN apk upgrade --no-cache && \
    apk add --no-cache bash openssl

ENV MIX_ENV=prod \
    SHELL=/bin/bash

WORKDIR /subs

COPY --from=builder /subs/_build/prod/rel/subs/releases/0.0.1/subs.tar.gz .

RUN tar zxf subs.tar.gz && rm subs.tar.gz

CMD ["/subs/bin/subs", "foreground"]
To make the secrets available on the environment when building the release, I’m using a mix of ARG and ENV.
ARG is used to pass built time variables to be used by Docker on the build phase but since we need them on the environment, we can set an ENV variable pointing to the respective ARG variable. You can read more about it here.
When building the Docker image, use --build-arg option to provide the secrets:
docker build -t subs:latest \
  --build-arg PHOENIX_SECRET_KEY_BASE=super_secret_phoenix_key_base \
  --build-arg SESSION_COOKIE_NAME=session_cookie_name \
  --build-arg SESSION_COOKIE_SIGNING_SALT=super_secret_cookie_signing_salt \
  --build-arg SESSION_COOKIE_ENCRYPTION_SALT=super_secret_cookie_encryption_salt \
  --build-arg DATABASE_URL=postgresql://postgres:postgres@localhost/subs_prod \
  .
To make sure we are still on track, let’s try running the app:
docker run --rm -it -p 4002:4002 -e PORT=4002 subs:latest
Hats of to Cultivate for the timing. Learned some cool stuff!
Setup AWS ECS cluster, EC2 and RDS
If you are new to AWS at all, I’ll give you a brief explanation of some of the services and tools we will be using. Even though I’m aware it will not be enough for you to understand what’s going on entirely, I hope it will help you with your investigation.
AWS ECS stands for AWS Elastic Container Service which we will be using to manage our containers. This goes from pushing the latest Docker image to start and stop the containers.
ECS will have at its disposal an EC2 (Elastic Compute Cloud) instance, which is the actual “machine” that will run the application from its Docker agent.
It’s on EC2 where we set the access rules which determines who can access the system where your application is running. These access rules are called Security Groups (SG). For instance, we will add a rule which allows the outside world access our application via port 80, and we will also have a rule that allows us to access the instance via SSH.
As for the database part, we will use AWS RDS (Relational Database Service) to host our Postgres instance.
The initial setup will be done through the AWS console web interface. This will make it easy to get comfortable with all the services we talked about before. However, we will be using the aws-cli to automate the deployment in the end.
Start by creating an AWS admin user
We will need a user to access ECS API programmatically so we can push the latest Docker image that contains our release. We will also need to start/stop the service that runs the container. Adding the user is straightforward.
Open the AWS console, and let’s get started!
1 - On the AWS console, find the IAM service, select users on the side bar and click Add user
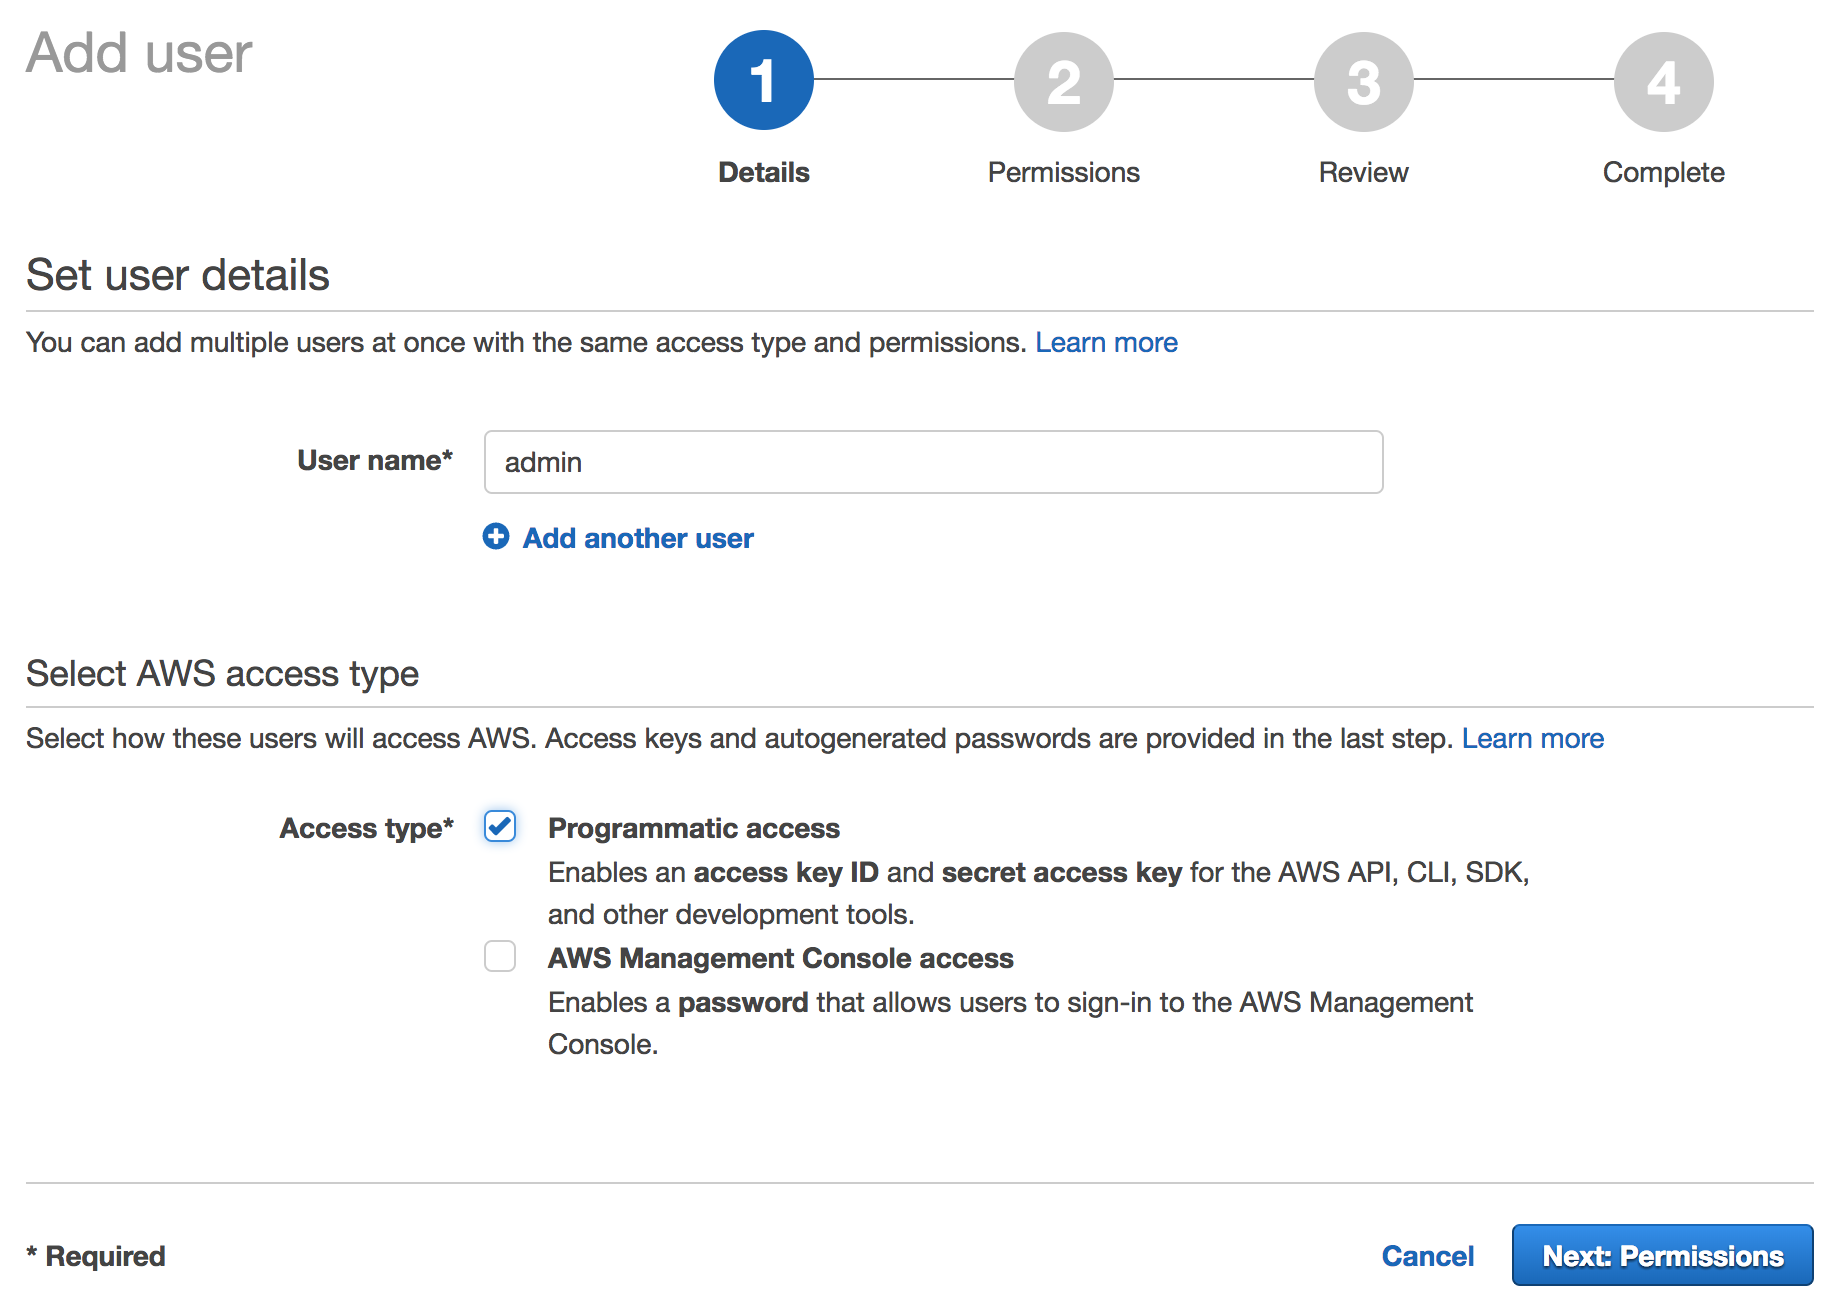
Make sure to tick Programmatic access, it will generate the AWS_ACCESS_KEY and AWS_SECRET_ACCESS_KEY.
Click next to add permissions to this user.
2 - Name the group as Admins and select AdministratorAccess
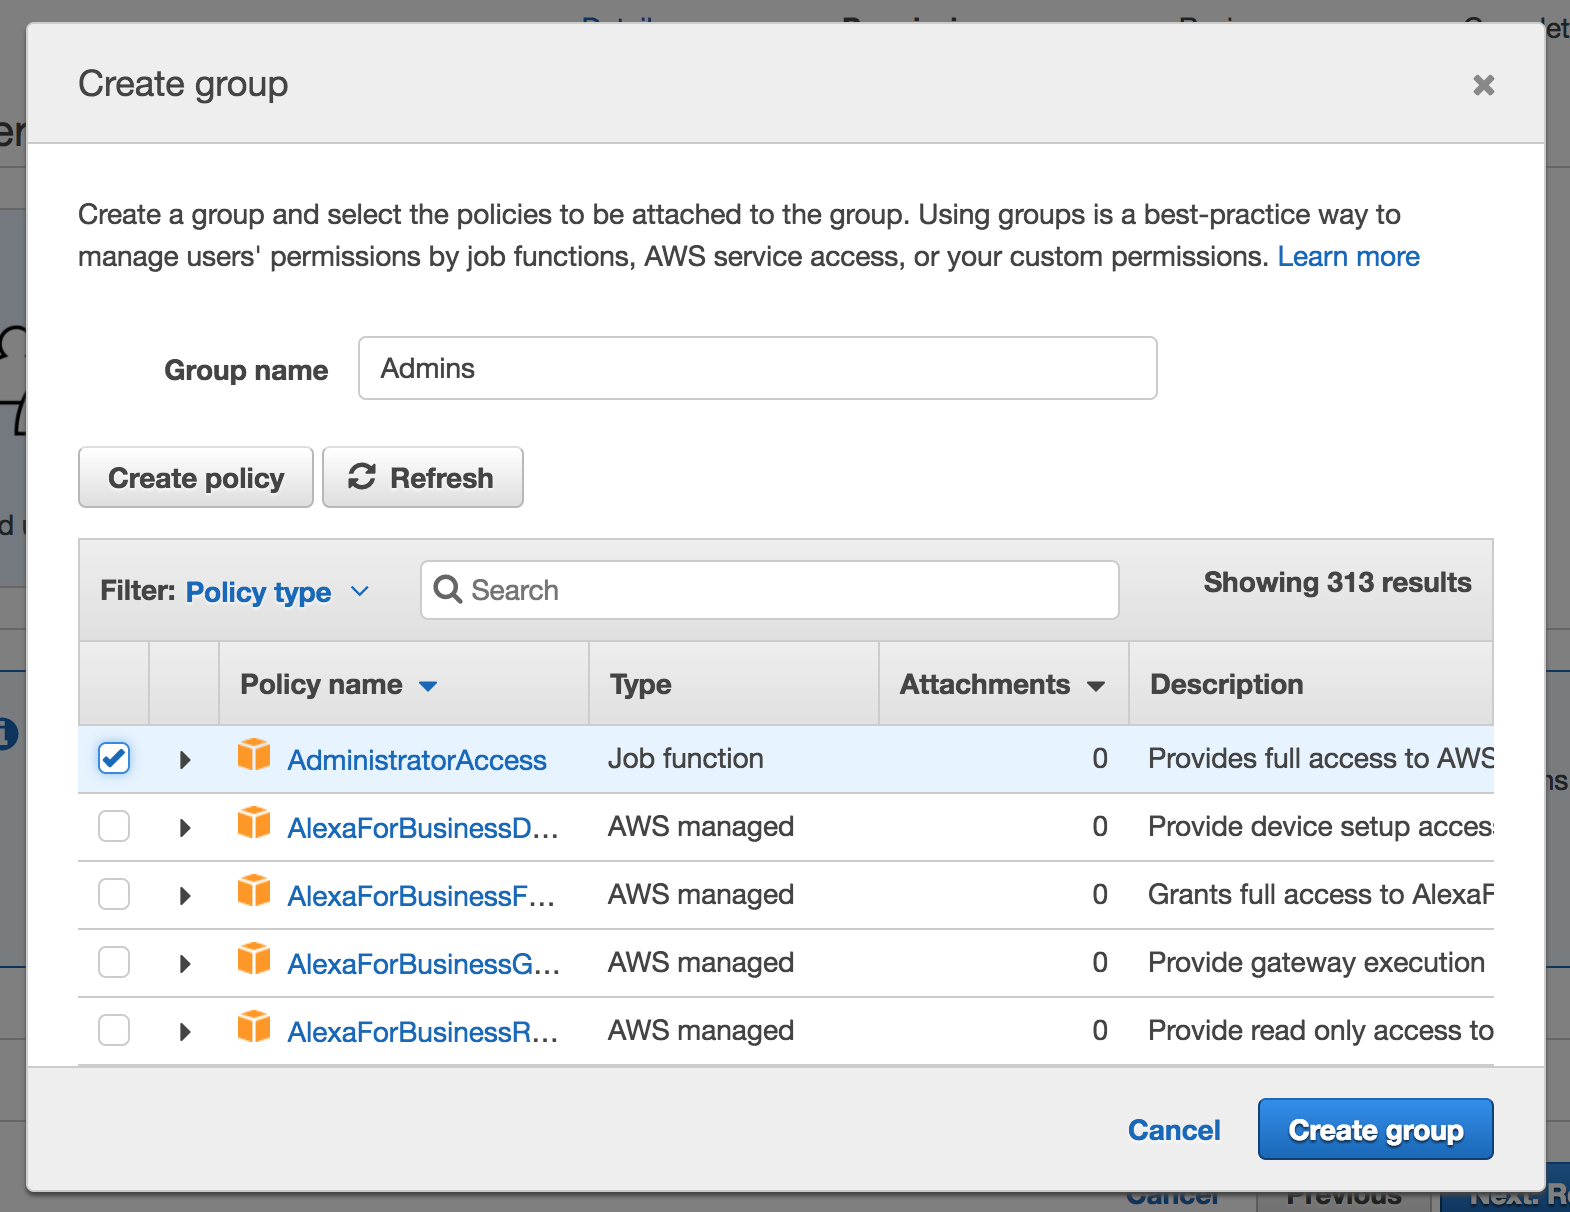
We could be a bit more specific here, but for the sake of the example, let’s keep it simple.
3 - Click Next and Create User
Here you’ll be presented with the AWS_ACCESS_KEY and AWS_SECRET_ACCESS_KEY. We just gave full permissions to AWS to the admin user, so make sure to store these keys safely.
We are done with the user.
Let’s create our ECS Cluster
We will create a cluster called opensubs-production.
When creating a cluster, a EC2 instance will also be created and attached to the cluster. Later we will change some configurations there.
1 - Find the ECS service (cancel the get started wizard if it shows up), click Create Cluster and select EC2 Linux + Networking as template

On the EC2 Instance Type, select t2.micro which is available on the free tier. The EC2 AMI ID may be slightly different depending on the region you chose.
On key pair, create a new one. After the wizard is completed, the private key (.pem) will be downloaded. Save it in a secure place since it gives you access to the EC2 instance where the Docker container is running.
On Networking, create a new VPC and leave the default configurations, it’s enough for the example. (Port 80 open 👍)
As for Container instance IAM role, it’s essential that ecsInstanceRole is selected otherwise the ECS Cluster is not going to be able to connect with the EC2 instance.
2 - Click Create to create the Cluster and wait for View Cluster button to be enabled
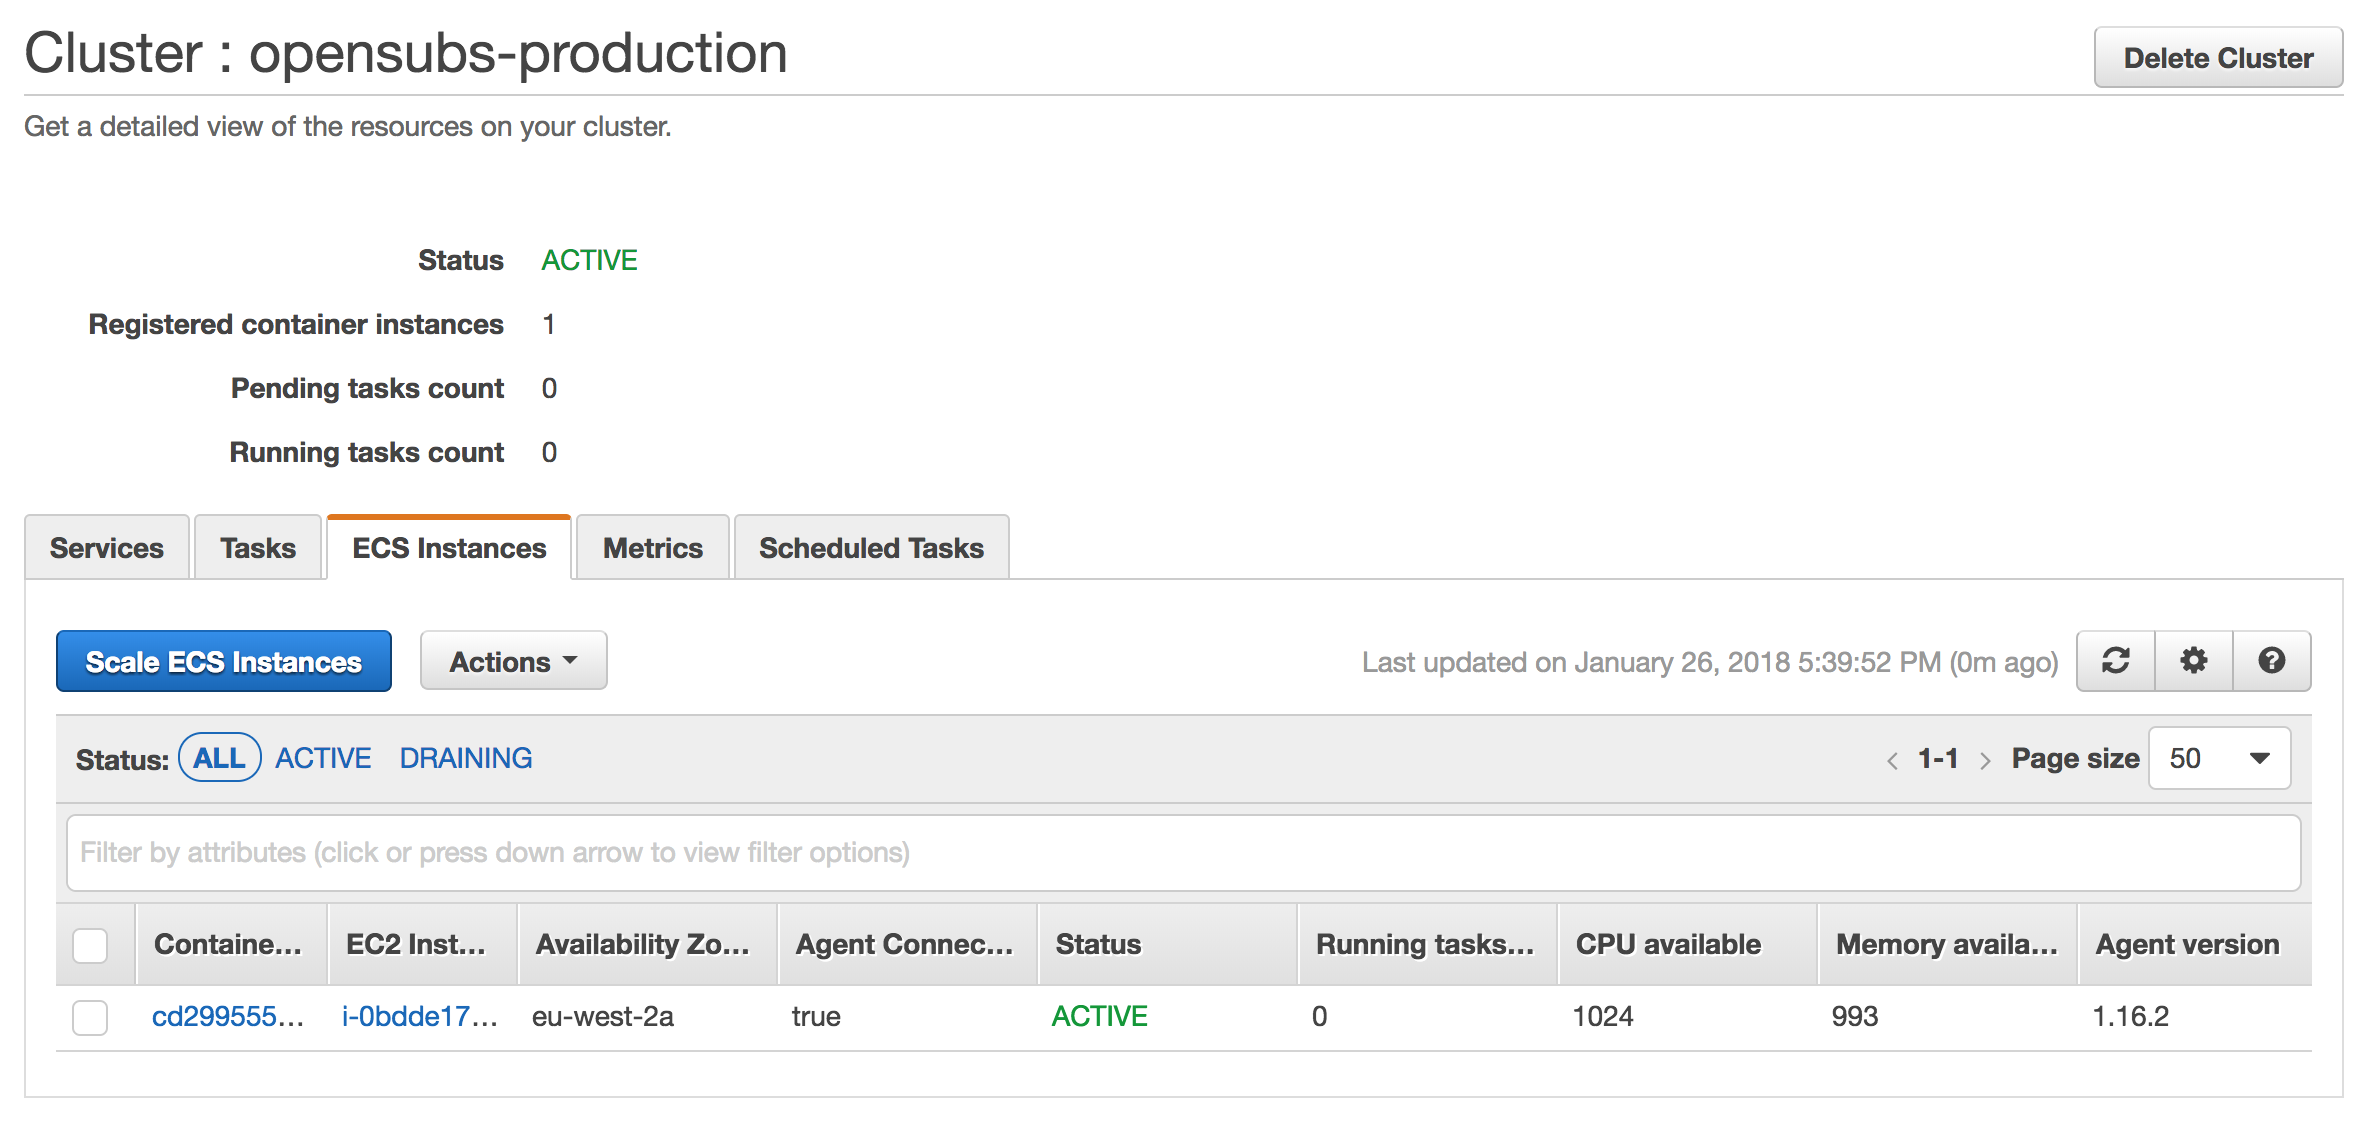
A couple of things happened here.
With the creation of the ECS Cluster, a VPC was created with a default Security Group. We will not do much with the VPC but we need to make sure that EC2 instance and RDS instance are in the same so have in mind the VPC ID for later.
Before taking care of the EC2 instance, let’s quickly create a Repository so we can push our Docker images. ECS will then pull the latest image from of our release from the Repository and run it on the EC2 instance.
Create the Repository
On the sidebar, navigate to Repositories and create a new one with the name of our Docker image: subs
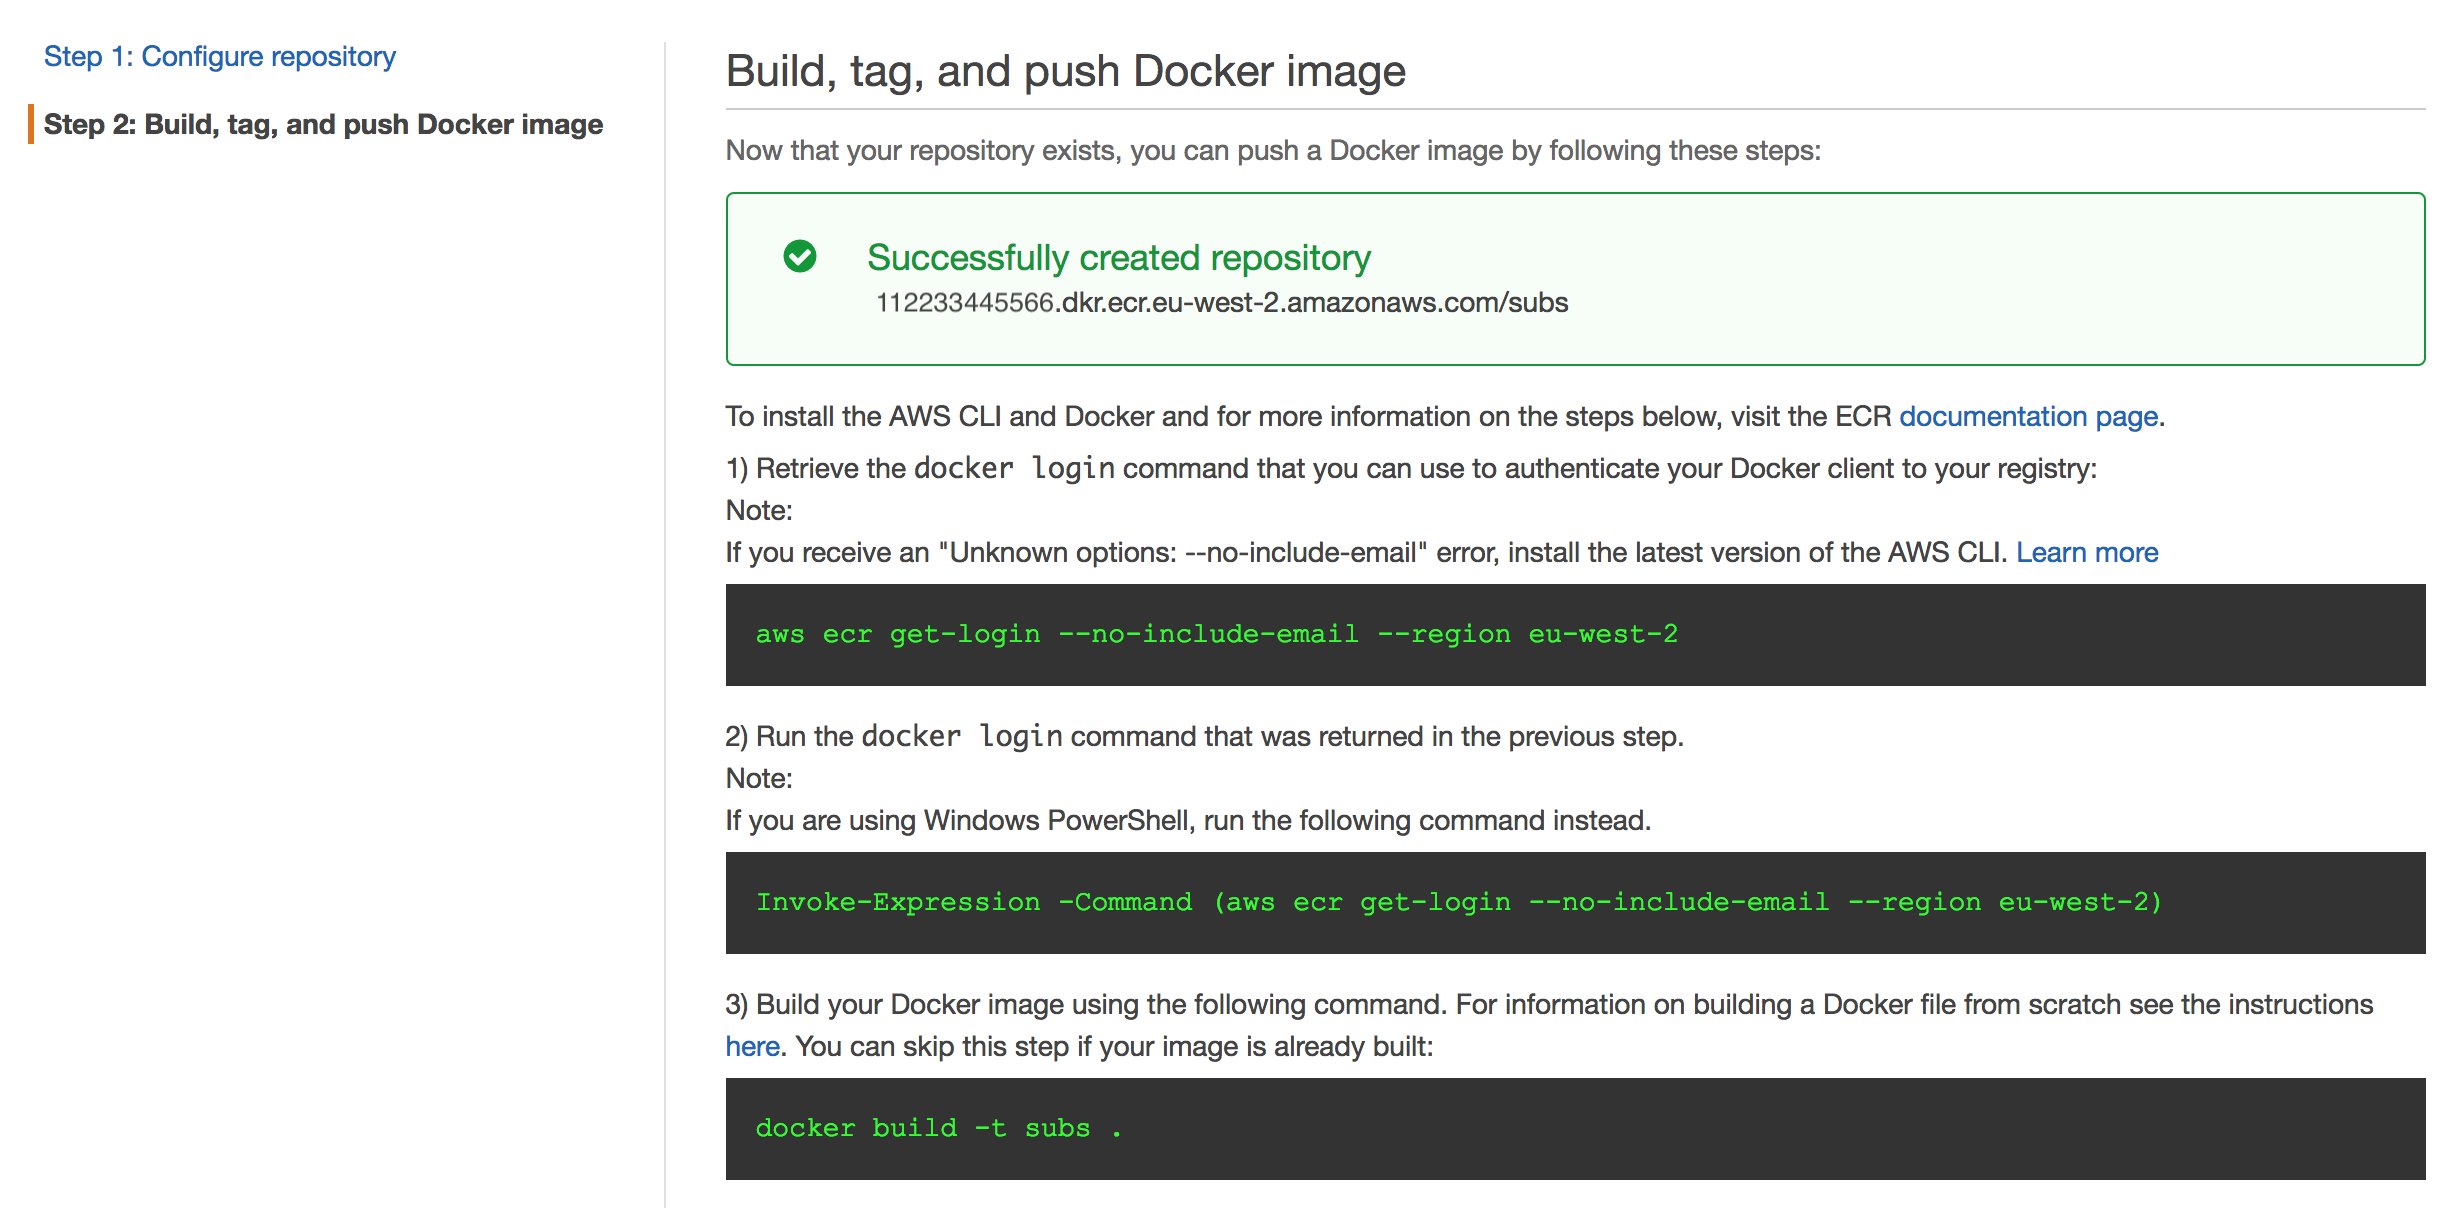
These commands are hints of what’s going to happen later. We will log in to ECR (Elastic Container Registry), build our Docker image and push it to this Repository. Like I said before, ECS will then grab the latest image from the Repository and start the container.
Take note of the url on the green box. It’s the url for the Repository and we will need it for deployment script to populate AWS_ECS_URL (without /subs at the end).
Setup the EC2 instance
1 - On the Cluster page, click on the EC2 Instance from your ECS instance

This is where we will manage our EC2 instance. Take the opportunity to save the Public DNS (IPv4), we will need it later to access our app and to set HOST environment variable.
Next, we will create two new Security Groups. One for SSH access and other to make EC2 and RDS know about each other. There’s already a rule that allows access from the outside world via port 80.
We will create our RDS instance in a minute, let’s take this out of our way first.
2 - On the sidebar, navigate to Security Groups and click to create a new one

This SG will be responsible for giving SSH access to the EC2 instance from your IP.
Save this one and let’s create another SG but this time without Inbound rules.
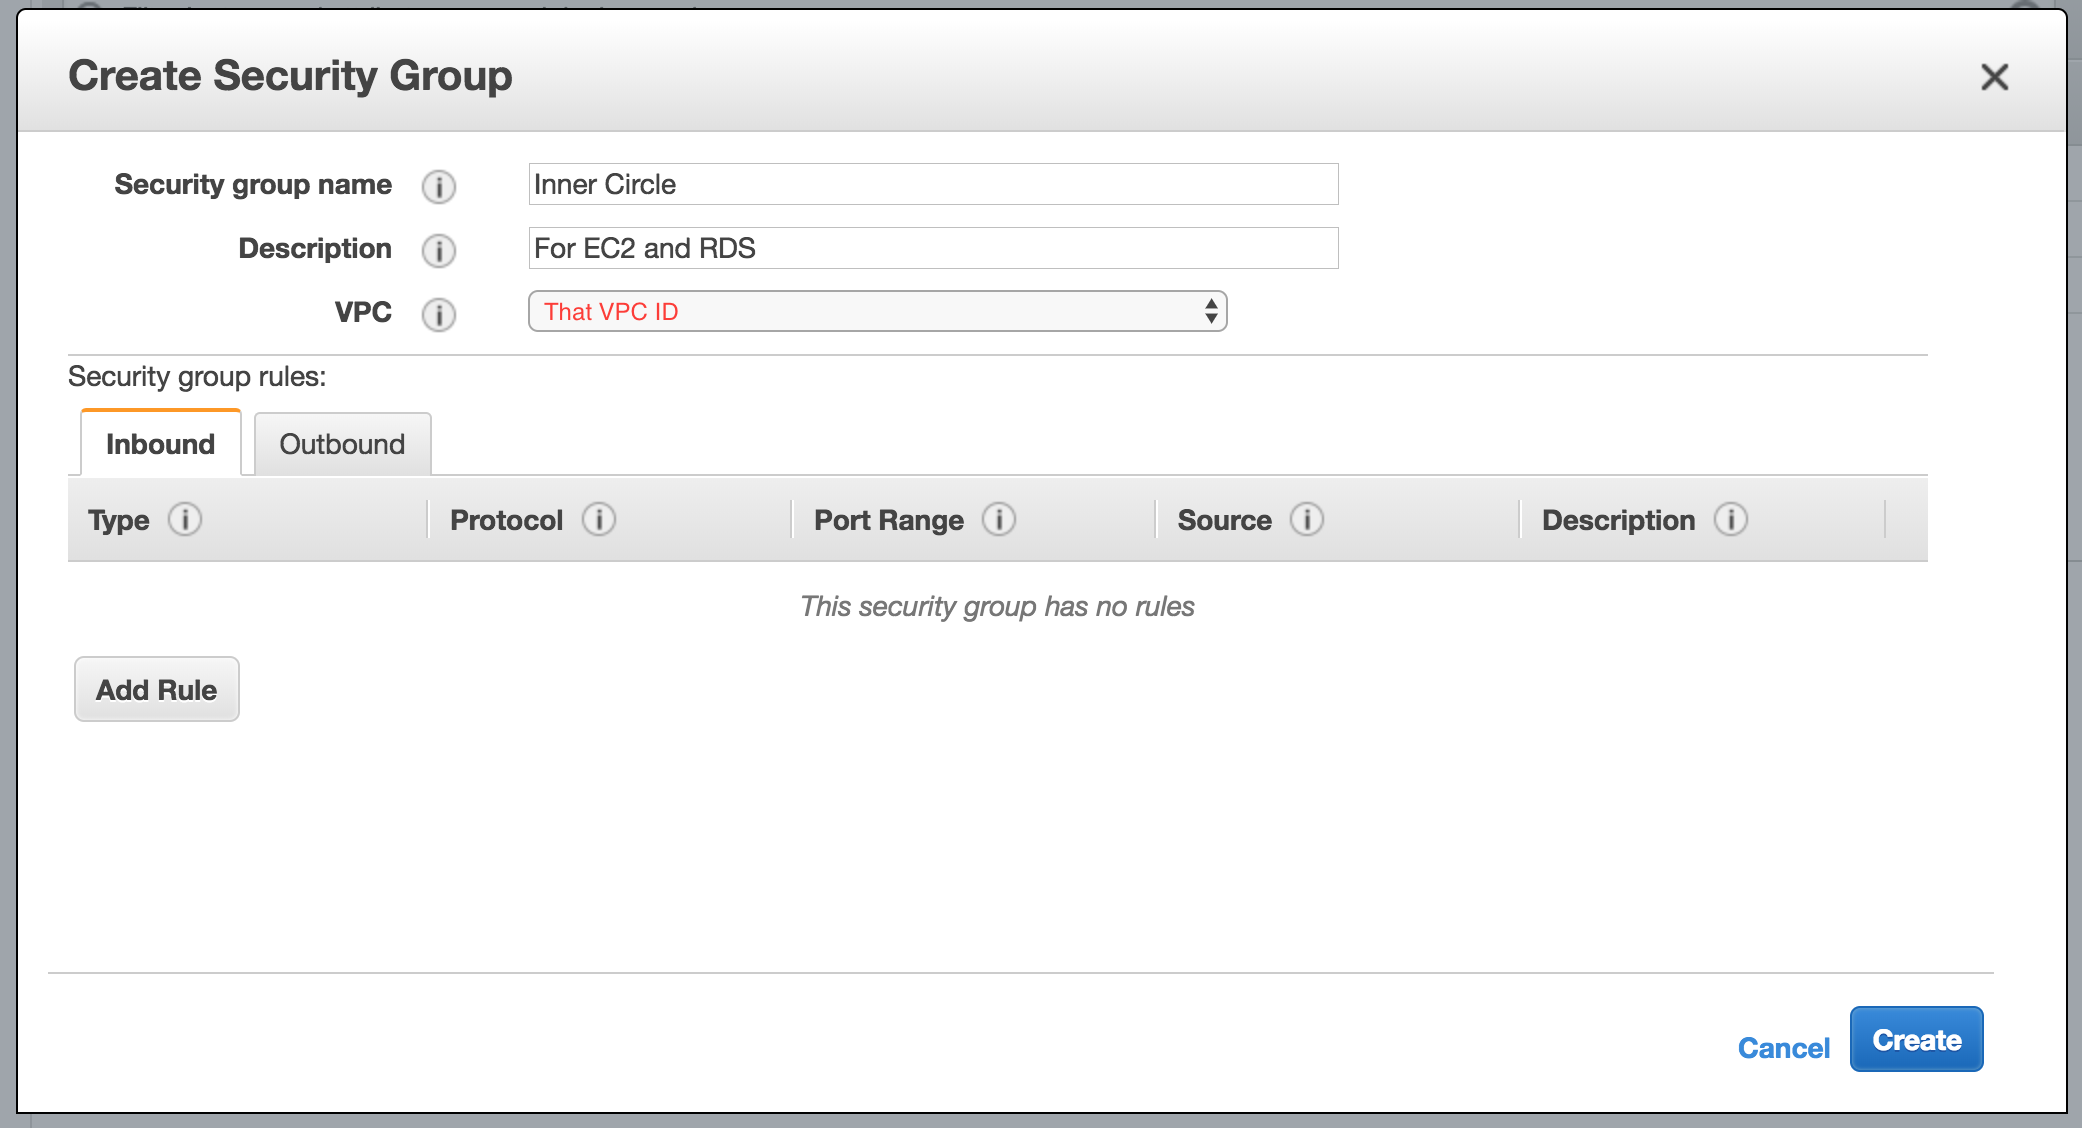
This SG will be responsible for making RDS know about EC2 meaning our application be able to access the Postgres database.
Click Create and let’s attach these two SGs to our EC2 instance.
3 - On the sidebar, navigate to Instances > select the recently created instance > click on Actions above > Networking > Change Security Groups
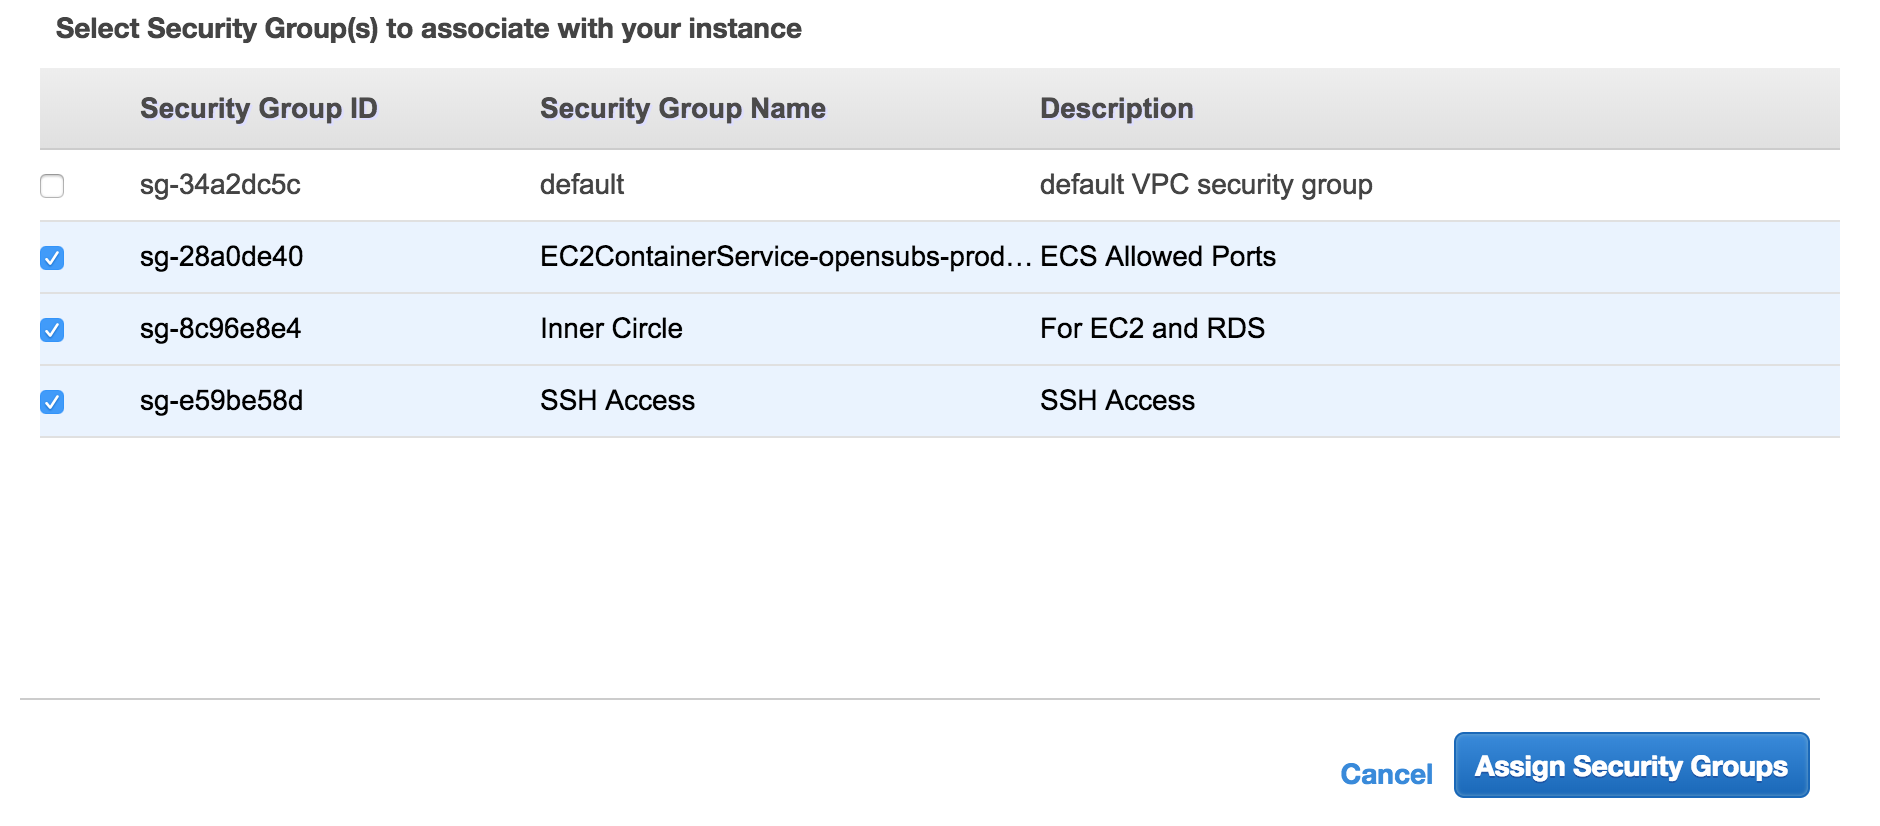
Select both SSH Access and Inner Circle and click Assign Security Groups.
Now we should be able to SSH into the EC2 instance.
Grab the private key and HOST saved earlier and try access the EC2 instance:
ssh -i PATH_TO_PRIVATE_KEY ec2-user@EC2_INTANCE_IP_OR_HOST
The setup is almost done!
We are finally going to create our RDS instance.
Setup a Postgres RDS Instance
1 - Find the Relational Database Service (RDS) and click get started to Launch a new DB instance
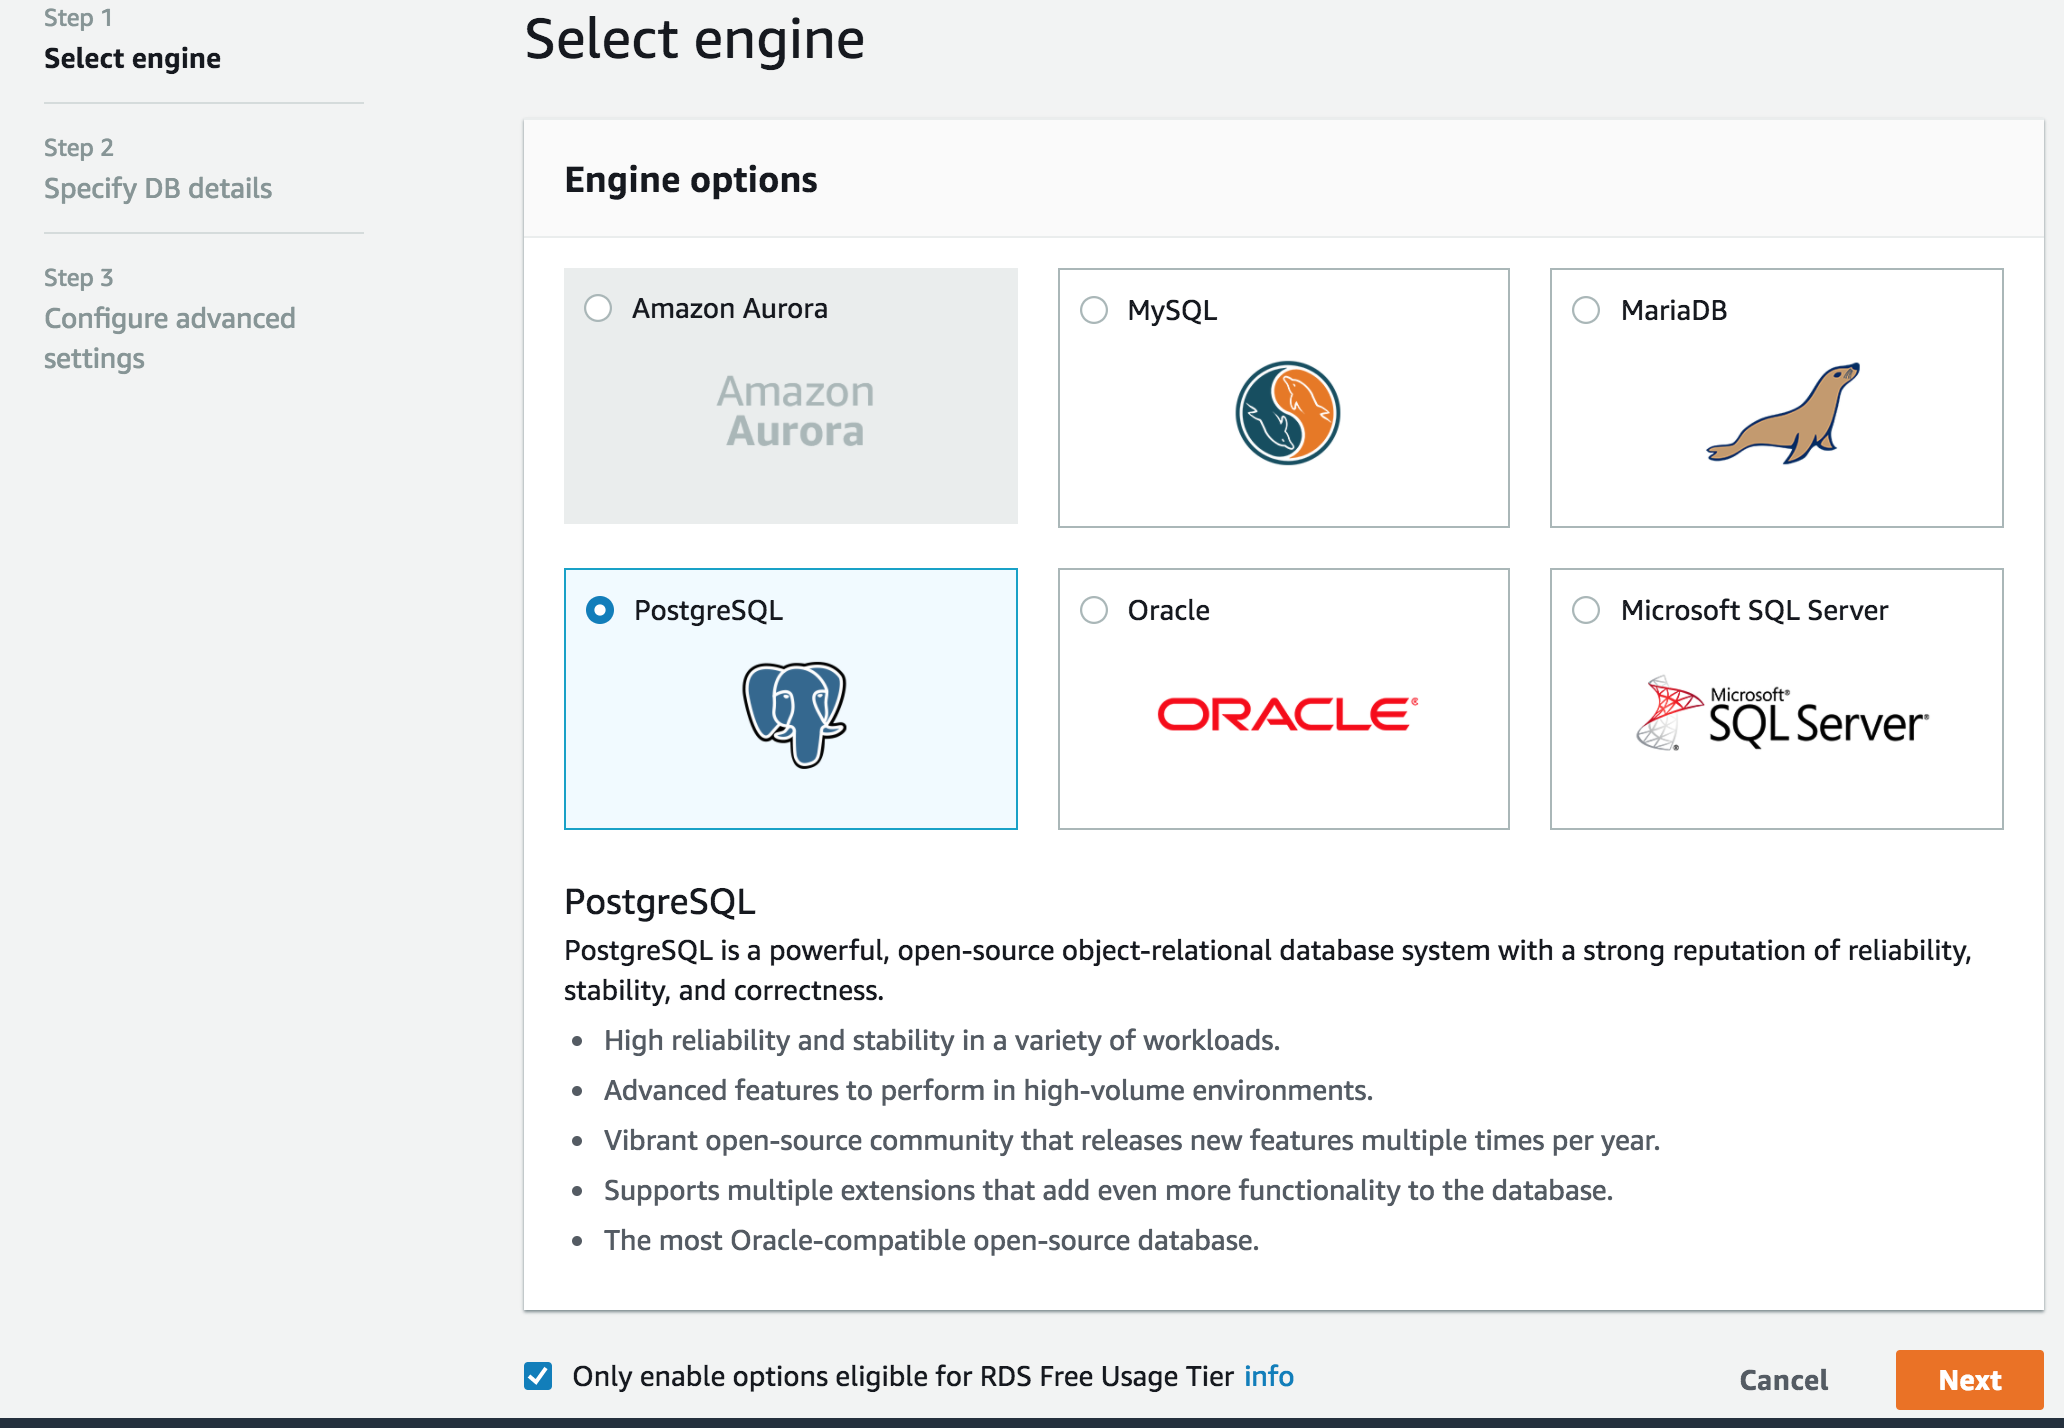
Here we are going to select PostgreSQL as our engine. Also, make sure to pick “Only enable options eligible for RDS Free Usage Tier”, this will reduce our options later on.
Click Next and set a Master username and a Master password. Make sure to save them so later we can build the DATABASE_URL config.
As for the DB Instance Identifier, opensubs-rds is fine.
2 - Click Next and select the VPC created before. This will put the RDS instance on the same network as the EC2 instance
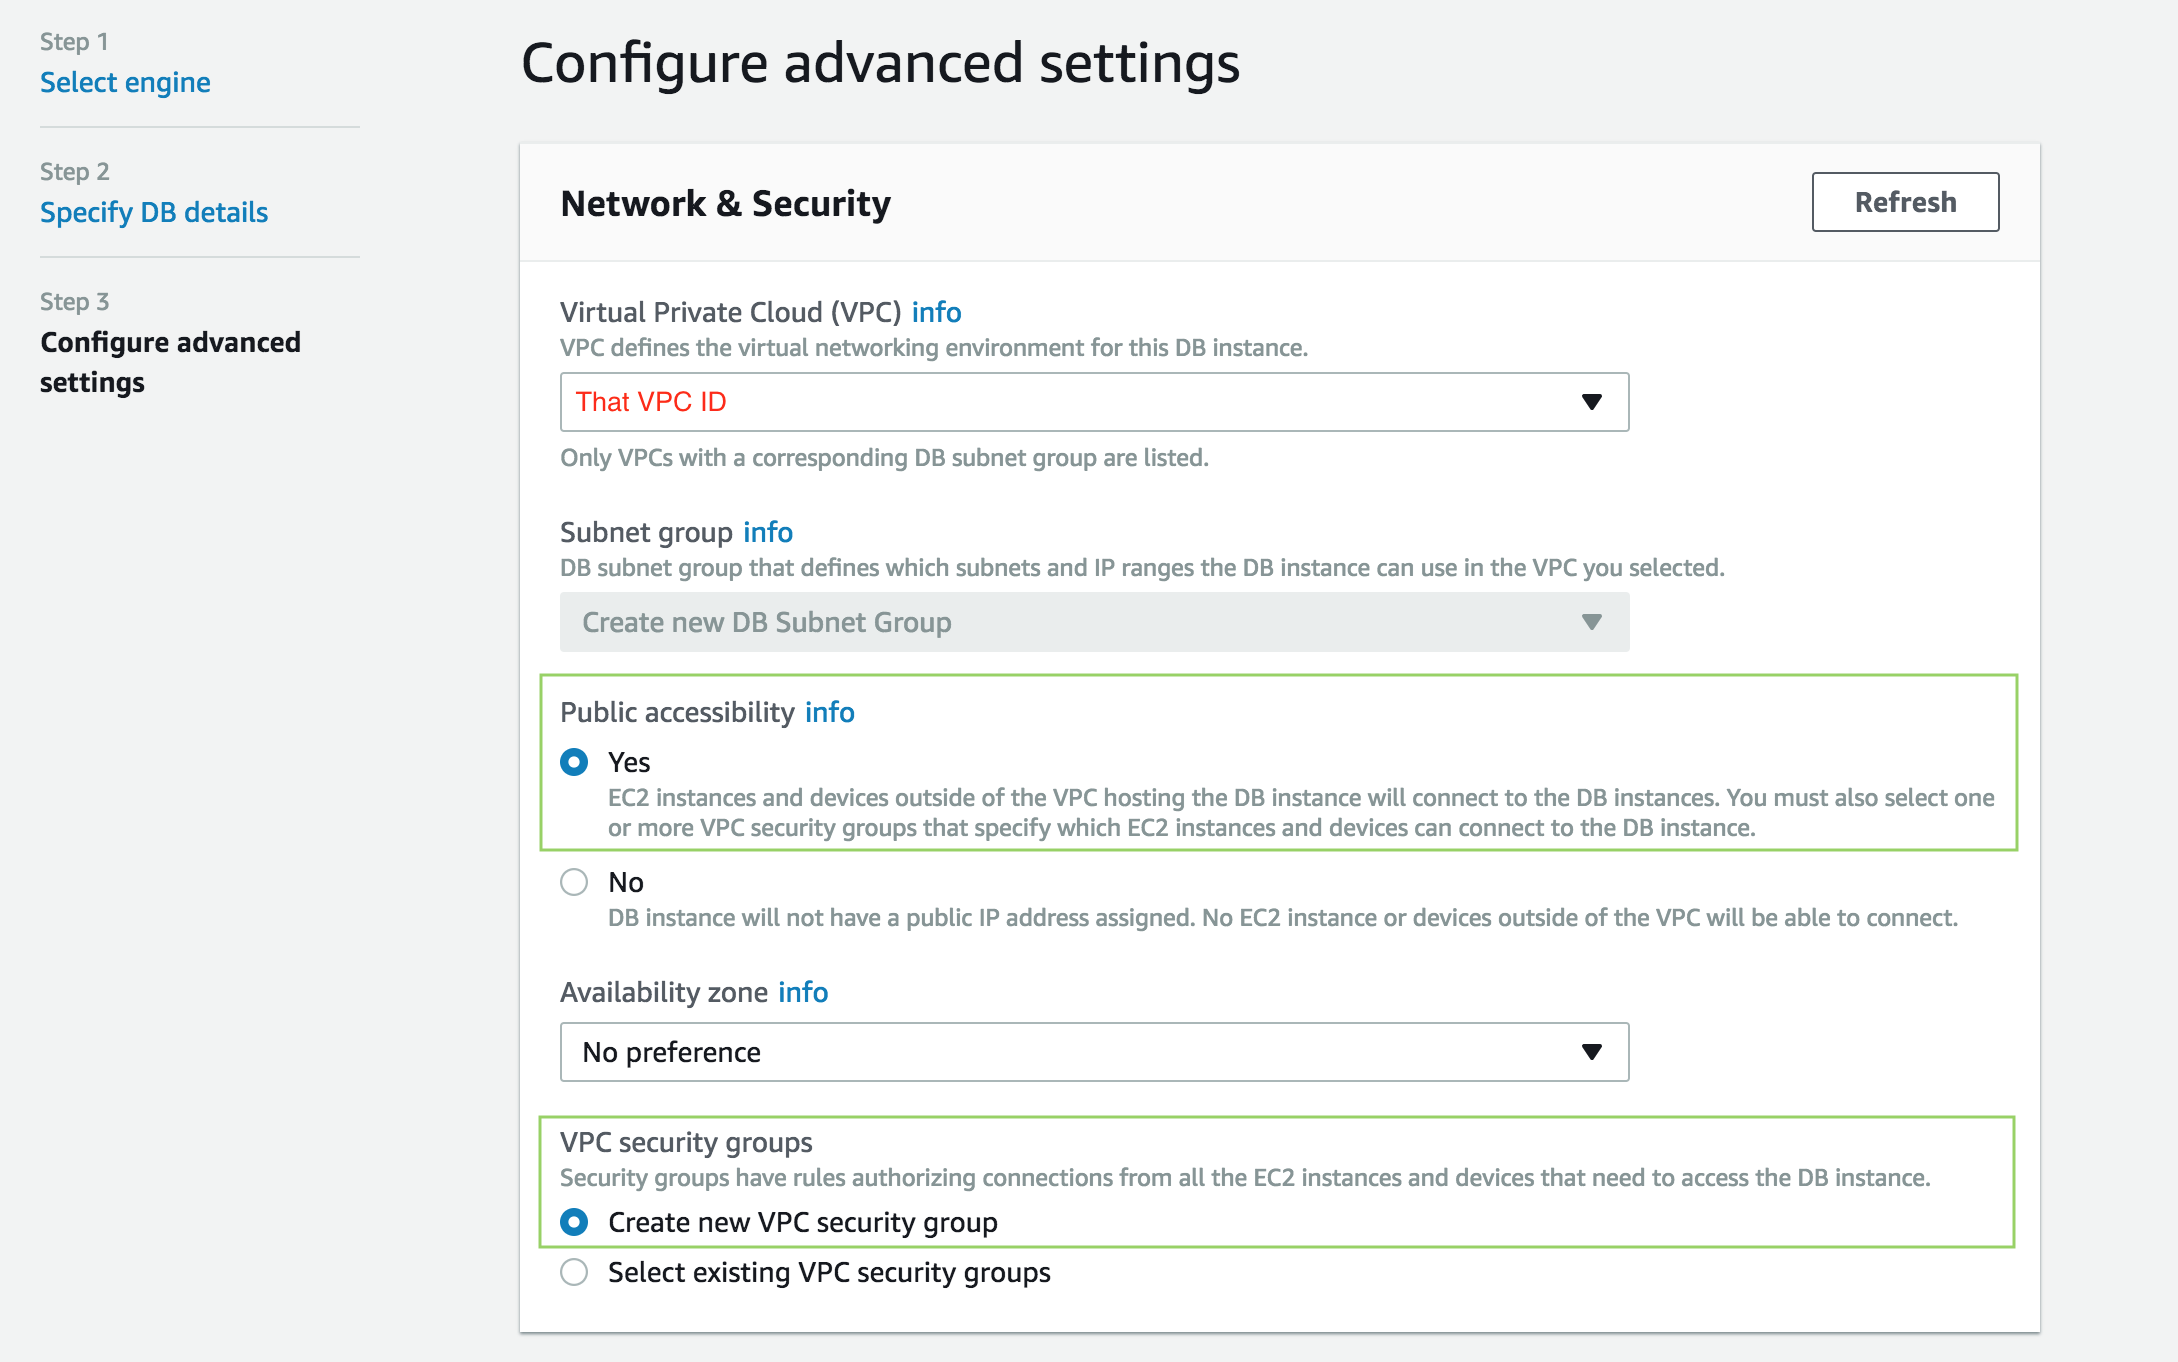
Here we are going to set Public accessibility to true so it can be accessed from outside the VPC. (e.g., our local Postgres client).
We are also going to create a new Security Group that we will configure so that the EC2 instance and our local client can access the database.
A bit bellow set the Database name to subs_prod which was the one used in the example above. Click Launch DB Instance and then View DB Instance Details.
It might get a while for the instance info to be available.
When it is, we will need to get the endpoint and user the Master username and Master password to build the DATABASE_URL:
DATABASE_URL="postgresql://USERNAME:PASSWORD@ENDPOINT/DATABASE_NAME"
Save it for later.
At this point, we have both EC2 and RDS instances up but they cannot communicate with each other. Let’s fix that.
3 - Find EC2 service, click on Security Groups on the sidebar and select the rds-launch-wizard
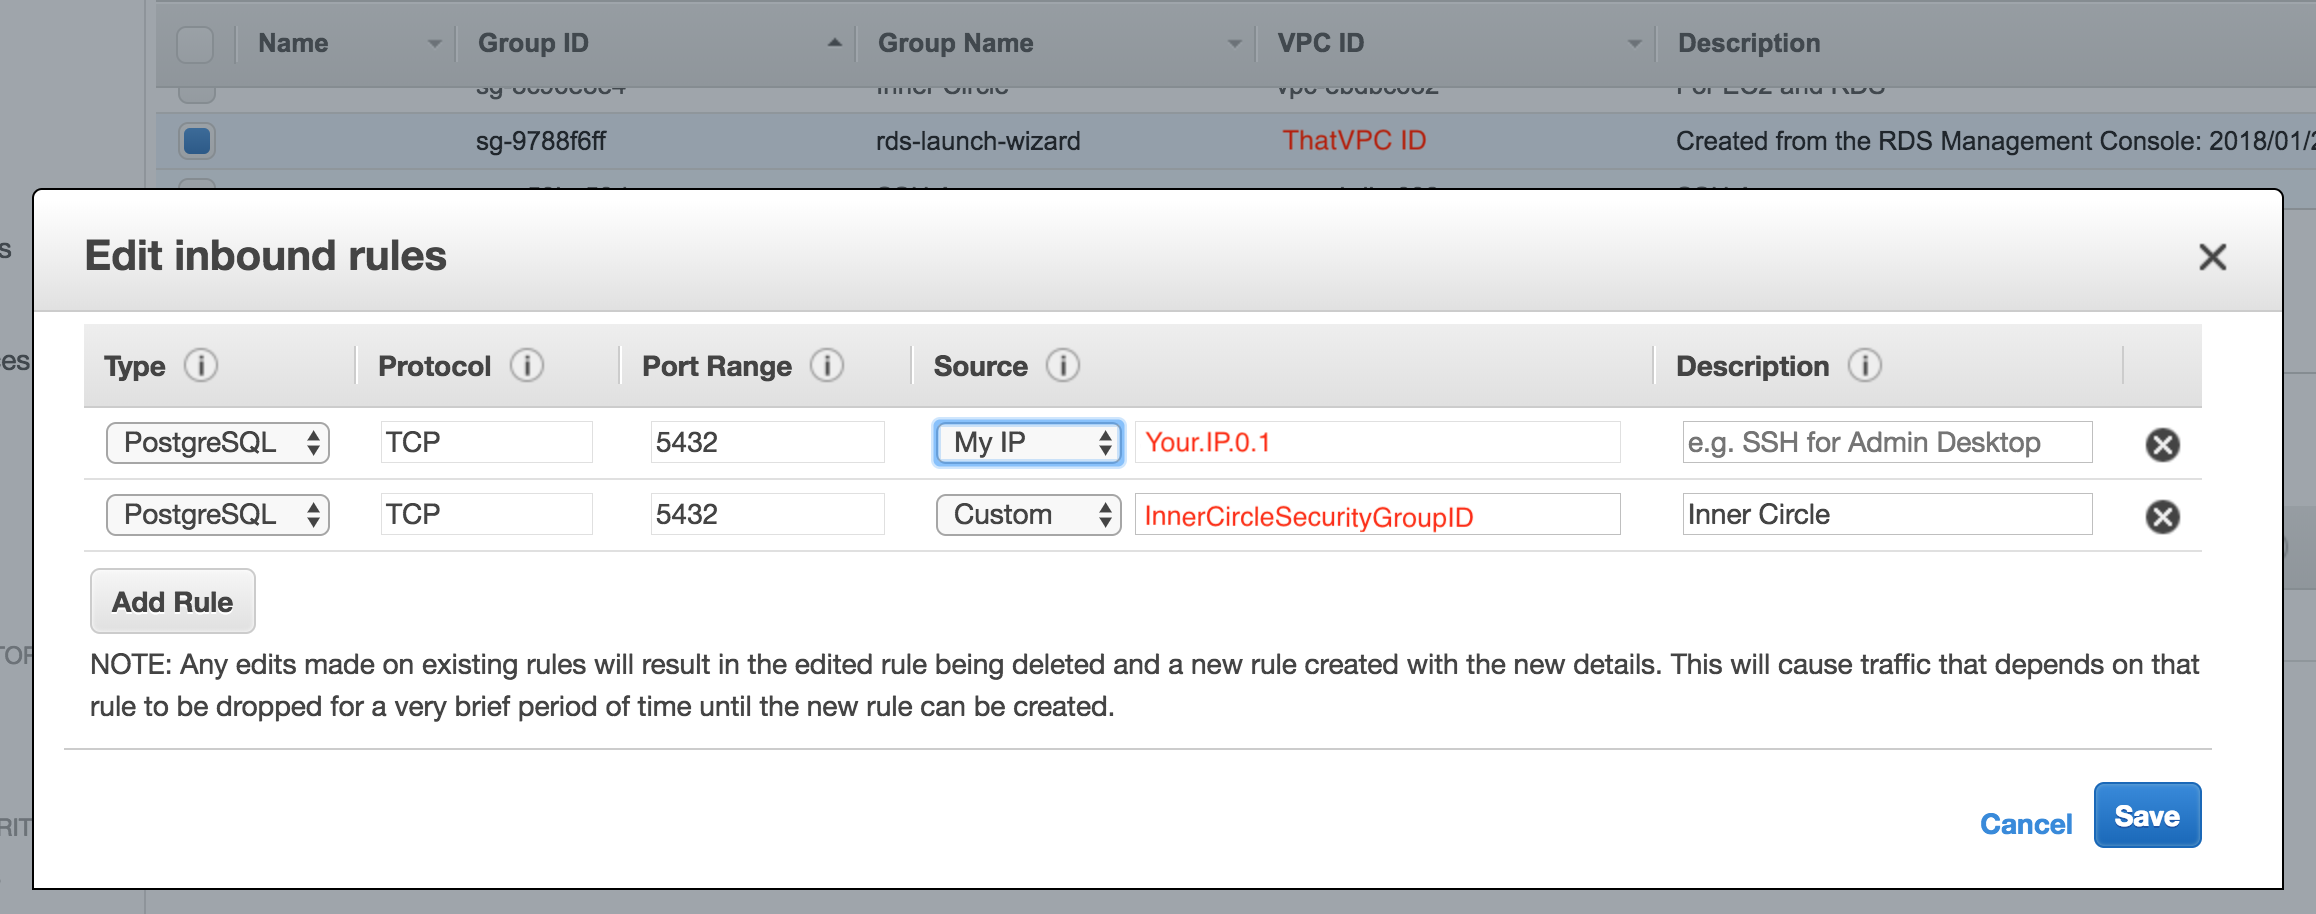
rds-launch-wizard was generated from the wizard we followed to create the RDS instance.
The first rule allows us to open a connection from our local machine.
The second rule (which is actually the Inner Circle SG ID, sg-123456) will open the connection between the EC2 instance and RDS instance.
This concludes our AWS setup. It was quite big, but I hope it gave you more insight on what you need to setup to have an application running with Docker. At least this is the kind of guide I hope I had found before falling into this rabbit hole 😄.
The last thing we need is to glue everything together with the deployment script.
Deploy the application
There are two things we need to install to run the deployment script: aws-cli and ecs-cli. The aws-cli will be used to push the latest Docker images to the ECS Repository and the ecs-cli to start and stop our container service. Both tools are required to run the deployment script.
Along with the deployment script, we need a config/deploy/docker-compose.yml file which will define one service for our application. Here’s what you need:
version: '2'
services:
  $AWS_ECS_CONTAINER_NAME:
    image: '$AWS_ECS_URL/$AWS_ECS_DOCKER_IMAGE'
    environment:
      - HOST=$HOST
      - PORT=$PORT
    ports:
      - '$PORT:$PORT'
The docker-compose.yml is all set with placeholders that will be replaced with the variables defined on the deployment script. This makes things easier to manage.
A couple of things to note here, HOST and PORT are going to the environment where the application is running as we configured before. image will point to the latest image we push to the ECS Repository.
Now here’s the detailed deployment script used to deploy the application to ECS:
#!/bin/bash

# If any of this commands fail, stop script.
set -e

# Set AWS access keys.
# This is required so that both aws-cli and ecs-cli can access you account
# programmatically. You should have both AWS_ACCESS_KEY_ID and
# AWS_SECRET_ACCESS_KEY from when we created the admin user.
# AWS_DEFAULT_REGION is the code for the aws region you chose, e.g., eu-west-2.
AWS_ACCESS_KEY_ID= # ------------------------------------------------ CHANGE
AWS_SECRET_ACCESS_KEY= # -------------------------------------------- CHANGE
AWS_DEFAULT_REGION= # ----------------------------------------------- CHANGE

# Set AWS ECS vars.
# Here you only need to set AWS_ECS_URL. I have created the others so that
# it's easy to change for a different project. AWS_ECS_URL should be the
# base url.
AWS_ECS_URL= # ------------------------------------------------------ CHANGE
AWS_ECS_PROJECT_NAME=opensubs
AWS_ECS_CONTAINER_NAME=subs
AWS_ECS_DOCKER_IMAGE=subs:latest
AWS_ECS_CLUSTER_NAME=opensubs-production

# Set Build args.
# These are the build arguments we used before.
# Note that the DATABASE_URL needs to be set.
DATABASE_URL= # ----------------------------------------------------- CHANGE
PHOENIX_SECRET_KEY_BASE=super_secret_phoenix_key_base
SESSION_COOKIE_NAME=session_cookie_name
SESSION_COOKIE_SIGNING_SALT=super_secret_cookie_signing_salt
SESSION_COOKIE_ENCRYPTION_SALT=super_secret_cookie_encryption_salt

# Set runtime ENV.
# These are the runtime environment variables.
# Note that HOST needs to be set.
HOST= # ------------------------------------------------------------- CHANGE
PORT=80

# Build container.
# As we did before, but now we are going to build the Docker image that will
# be pushed to the repository.
docker build --pull -t $AWS_ECS_CONTAINER_NAME \
  --build-arg PHOENIX_SECRET_KEY_BASE=$PHOENIX_SECRET_KEY_BASE \
  --build-arg SESSION_COOKIE_NAME=$SESSION_COOKIE_NAME \
  --build-arg SESSION_COOKIE_SIGNING_SALT=$SESSION_COOKIE_SIGNING_SALT \
  --build-arg SESSION_COOKIE_ENCRYPTION_SALT=$SESSION_COOKIE_ENCRYPTION_SALT \
  --build-arg DATABASE_URL=$DATABASE_URL \
  .

# Tag the new Docker image as latest on the ECS Repository.
docker tag $AWS_ECS_DOCKER_IMAGE "$AWS_ECS_URL"/"$AWS_ECS_DOCKER_IMAGE"

# Login to ECS Repository.
eval $(aws ecr get-login --no-include-email --region $AWS_DEFAULT_REGION)

# Upload the Docker image to the ECS Repository.
docker push "$AWS_ECS_URL"/"$AWS_ECS_DOCKER_IMAGE"

# Configure ECS cluster and AWS_DEFAULT_REGION so we don't have to send it
# on every command
ecs-cli configure --cluster=$AWS_ECS_CLUSTER_NAME --region=$AWS_DEFAULT_REGION

# Build docker-compose.yml with our configuration.
# Here we are going to replace the docker-compose.yml placeholders with
# our app's configurations
sed -i '.original' \
  -e 's/$AWS_ECS_URL/'$AWS_ECS_URL'/g' \
  -e 's/$AWS_ECS_DOCKER_IMAGE/'$AWS_ECS_DOCKER_IMAGE'/g' \
  -e 's/$AWS_ECS_CONTAINER_NAME/'$AWS_ECS_CONTAINER_NAME'/g' \
  -e 's/$HOST/'$HOST'/g' \
  -e 's/$PORT/'$PORT'/g' \
  config/deploy/docker-compose.yml

# Deregister old task definition.
# Every deploy we want a new task definition to be created with the latest
# configurations. Task definitions are a set of configurations that state
# how the Docker container should run and what resources to use: https://docs.aws.amazon.com/AmazonECS/latest/developerguide/task_definitions.html
REVISION=$(aws ecs list-task-definitions --region $AWS_DEFAULT_REGION | jq '.taskDefinitionArns[]' | tr -d '"' | tail -1 | rev | cut -d':' -f 1 | rev)
if [ ! -z "$REVISION" ]; then
  aws ecs deregister-task-definition \
    --region $AWS_DEFAULT_REGION \
    --task-definition $AWS_ECS_PROJECT_NAME:$REVISION \
    >> /dev/null

  # Stop current task that is running ou application.
  # This is what will stop the application.
  ecs-cli compose \
    --file config/deploy/docker-compose.yml \
    --project-name "$AWS_ECS_PROJECT_NAME" \
    service stop
fi

# Start new task which will create fresh new task definition as well.
# This is what brings the application up with the new changes and configurations.
ecs-cli compose \
  --file config/deploy/docker-compose.yml \
  --project-name "$AWS_ECS_PROJECT_NAME" \
  service up
Create the file config/deploy/shipit.sh which the deployment script and run it:
sh config/deploy/shipit.sh
Finally, accessing the application via EC2 public DNS (that we’ve used on HOST environment variable) should display the default Phoenix Framework page!
I’m not expecting everything to go smoothly so if you have questions or something went wrong, go to the Github issue I’ve created to discuss this guide.
All the changes made to the initial commit can be found on the deployment branch: https://github.com/joaquimadraz/opensubs.io/tree/deployment